
My Disney Experience login is a crucial technicality that everyone wanting to visit Disney World should be well equipped with.
We often see vacations as faraway places where we can stay away from our cell phones for a bit. However, Disney World will not let you immerse yourself in its world while forgetting your phone.
Instead, only if you are adept in the know-how of your phone can you simulate your experience better. Here’s how!
My Disney Experience log in is instrumental in making your experience better. If we put it in other words, you will not be able to function inside Disney World if you do not have a My Disney Experience login credentials.
From entering the park to making your park pass reservations, calculating wait times, and entering resort rooms, everything needs you to have the My Disney Experience app.
So, one will not exaggerate if they say My Disney Experience holds the magic wand to make your Disney World visit magical!
So, this article will help you familiarise yourself with the My Disney Experience app and its machinations.
Alongside this, you will understand the importance of My Disney Experience in making Disney World park reservations.
Moreover, you will also gain an insight into Disneyland park reservation systems. It will also help you better understand how to use the app inside the parks.
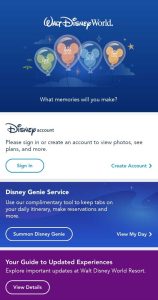
Table of Contents
My Disney Experience app know-hows
If you want a one-stop solution to make your Disney World vacation swifter, My Disney Experience is your go-to place.
From purchasing tickets and using Genie+ to even using it as the room locker, My Disney Experience has diverse utilities.
Setting up the account
So, here is a helpful guide to setting up your My Disney Experience app login credentials:
Creating the account
In the very beginning, you need to create your account in the completely free app. Moreover, this is not an app that burdens you with putting in too much personal information. Instead, you must put in your name, email address, and payment information.
You can even choose a character for yourself to make things interesting from the beginning. If you get bored with your character, you can change it whenever you want.
Disney World might not offer adults to deck up in character costumes, but this is where you can try that (although, sadly, in virtual reality).
Creating a Family & Friends list
After this, you will have to link your friends and family to your account. If you are a solo traveler, then there is no need for this.
However, if you plan the trip with your friends or family, you can link their reservations here.
By selecting the “add a guest” option, you can add your friends or family members to your list.
You can either add them manually or, if they already have their account, it gets easier to find them.
Moreover, you can also share this list with your family and friends. That way, everyone gets the hang of everything stored in a single space.
Linking reservations
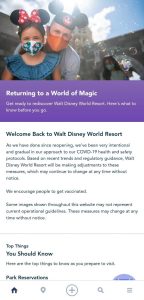
My Disney Experience platform is indispensable for your visit to the Disney World parks or your resorts.
In a recent wave of change, Disney World has made it mandatory for everyone to carry a parking pass, even if they have park tickets.
While this has impacted spontaneous traveling negatively, on the brighter side, it has also systematized traveling.
Disney park reservations for 2022 are thus a must that cannot be done without the My Disney Experience app.
So, using your My Disney Experience app login, you will have to first link your hotel reservations and park tickets to the app. Only if you connect these can you make your park pass reservations.
Also, you will have to choose the dates when you would like to go park hopping. Thus, after Covid-19, even if you have your annual passes, you will still require passes for the individual days.
Disney Park Pass reservations
Let’s now look at how to make Disney park pass reservations using the My Disney Experience app log in.
Initial check-points
One of the essential things to check before proceeding is Disney park reservation availability. Depending on that, you will have to proceed with your bookings. Usually, the passes are available 45-60 days before your visit.
However, to be extremely sure, you might want to take the help of the Disney park reservation calendar. The green boxes signify the availability of all the parks on those dates, the yellow ones tell that of some parks, and the grey ones denote no park passes.
Once you have checked the availability of passes, the My Disney Experience app login will come to your help.
Making the reservations
On the app, first, spot the plus sign. After selecting, you will notice a bar reading “Make a park reservation.” After you click this, you will be redirected to the Disney website. From here, you can make your reservation.
Even if you cannot make park pass reservations directly from the MDE app, you will need your My Disney Experience app to log in to make reservations from the website.
If you are using the website, go to the My Disney Experience dropdown and select “Disney Park Pass System.” This will require you to have your account on the website and the My Disney Experience platform.
After this, you can either make a reservation or modify your reservation. So, choose the button that fulfills your requirement.
You can even make reservations for your group in a single pass. Your group member might include both regular ticket holders and pass holders. You are eligible for one pass only if none of them has made any resort-related reservations.
However, the scenario changes if you make a reservation for an annual pass holder who has also booked a hotel stay. Here, you will have to select the preferred hotel stay for making your park pass reservations. However, this will not appear if you don’t have anyone with Hotel stay reservations.
The list of guests that you had created using your My Disney Experience app log in will now come to help.
Depending on the ticket type and the number of reservations that have already been made, you will see the rest of the reservation availabilities under each guest’s name.
Selecting the date and parks
After that, you will have to fix the date you want to travel.
After selecting the dates, you will get the list of parks available for a pass reservation on that particular date. Once you have chosen the park, click continue. You will be directed to a screen showing “Review & Confirm.”
Even if you see your plans at this point, the page will not show your park passes. You will have to scroll down to the very bottom of the page.
Final step
There, you will see the email ID that is there on your My Disney Experience account. Check that box, and only then are you all done. After that, they will send you a confirmation email, and you should keep that handy for further use inside the park.
Other important usages
So, here are some of the other valuable components of the My Disney Experience app that improve your experience:
My Plans
If you are a planner, this section will entice you the most. You will have the details of every plan that you have made in one place.
It even includes days in the park as well as resort stays. If you have more than one trip lined up in the upcoming days, the section will also reflect them in proper order.
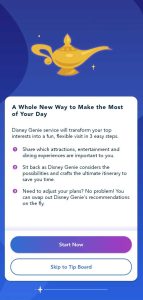
Disney Genie+ and virtual queues
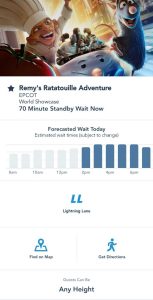
Disney Genie+ is also available on the My Disney Experience app. A paid service helps you to make Lightning Lane reservations where you can skip the standby lines.
However, this cannot be done in advance, unlike the FastPass system, which is no longer running. Genie+ selection can only be made on the day you visit the park.
It will cost you $15-$22 per person daily and allow for only one purchase daily. However, most of the popular locations are not in Genie+. For them, you will have to pay for Lightning Lane selections.
Disney MagicMobile
You can even enter the theme parks and your resort rooms using your My Disney Experience app log-in. Once you link your reservations and stay, you must set up the Disney MagicMobile.
Once that is done, you can use the same for joining the virtual queue, PhotoPass, and park entry.
Mobile Food Orders
One of the most important utilities of the My Disney Experience app is that you can make orders for food from your mobile. After a tiresome day at the park, most visitors prefer a sumptuous meal delivered to their doorstep.
So, if you make the proper use of the My Disney Experience app log in, this is also possible. So, instead of going to the restaurants, you can browse their menu from your room. After that, set a pickup time, and you will have your food delivered right to your room.
Merchandise
My Disney Experience will also allow you to buy products while heading back home. So, go to shopDisney and select the merch you want to purchase. You can even compare in-park prices.
Park Hours & info
The most important part of the MDE platform is the option to check the park hours. Thus, you can have up-to-date information regarding every ride and park by checking on that.
Disneyland Park Reservations
Reservations are mandatory in every Disney premises all over the world. Disneyland in California is also not an exception.
If you are a Magic Key Pass holder, you need to make your reservations 90 days in advance, or else they are available for reservations up to 120 days in advance. Before buying the tickets, you must select the reservation dates.
Use the Disneyland park availability calendar to determine the most suitable dates for your visit. Some days might have just one park available, and you would not want to fly to America for that.
So, choose the days when most of the parks are open. Moreover, there is a difference between the Park Hopper calendar and the 1-day ticket calendar. So, choose wisely.
Some days require a specific tier-level ticket. Holidays and weekends might require higher-tier tickets, while weekdays, especially Tuesdays, and Thursdays, require a one-time key which is less costly.

Step-by-step guide for reservation at Disneyland
So, to buy your 1-day ticket, go to the Disney site. Then follow the steps to make your Disneyland park reservations.
- First of all, click “Select Ticket” in Park Reservation.
- Secondly, you will have to decide the number of days of your park visit.
- Thirdly, select the total ticket numbers for all the members of your party.
- Fourthly, choose the ticket type- park hopper or one park per day ticket.
- Fifthly, you will have to choose a date for your theme park reservation here. If you want a Park Hopper ticket, select the park that makes your hopping point each day and the next.
- Sixthly, you can also select the “add-on” option to purchase advance parking vouchers.
- Finally, review all the selections and buy the tickets!
However, just like you need My Disney Experience log in to make Disney World reservations, similarly, you will need the Disneyland Experience app to make reservations in Disneyland.
Thus, you see the inevitability of using the My Disney Experience app on your Disney World vacation.
Final Thoughts
So, it seems My Disney Experience app login is the magic wand to improve your experience in every way possible. Use this free resource and gift yourself the best vacation you deserve.


